前言
用过几款上传图片到图床的软件,但是自己常用的图床,比如青云对象存储基本都没有支持的。
刚好前几天发现了一款可以自定义插件的图片上传软件 PicGo,借此机会正好为其新增青云对象存储图床的支持。
项目地址:picgo-plugin-qingstor-uploader
准备工作
插件基于 PicGo-Core 开发,参阅开发文档 PicGo-Core-Doc 进行开发。
确保已安装 Node.js 版本 >= 8
全局安装
使用插件模板
picgo init plugin <your-project-name>
|
- 所有插件以
picgo-plugin-xxx 的方式命名 - 按照提示配置你的项目
开发插件
picgo 是个上传的流程系统。因此插件其实就是针对这个流程系统的某个部件或者某些部件的开发。
附一下流程图:
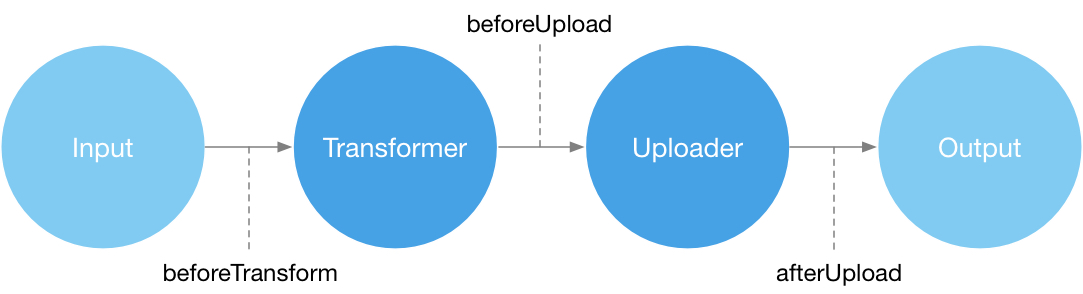
其中可以供开发的部件总共有5个:
两个模块:
- Transformer
- Uploader
三个生命周期插件入口:
- beforeTransformPlugins
- beforeUploadPlugins
- afterUploadPlugins
通常来说如果你只是要实现一个 picgo 默认不支持的图床的话,你只需要开发一个 Uploader 。
我们这里只是开发图床的话就只需要开发 Uploader 即可。
这里定位到项目的 src/index.ts 或 src/index.js ,
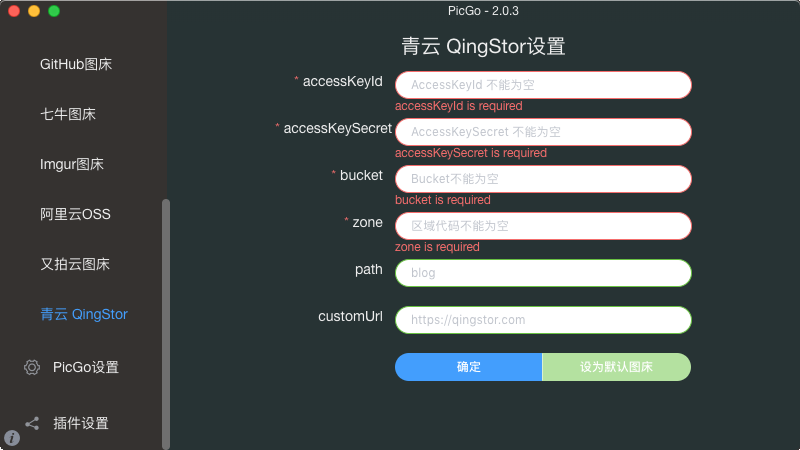
在这里就是你所要支持图床的配置的地方了。
图床配置文件
添加必须的配置项,新增图床配置:
import { PluginConfig } from 'picgo/dist/utils/interfaces'

const config = (ctx: picgo): PluginConfig[] => {
  let userConfig = ctx.getConfig('picBed.qingstor-uploader')
  if (!userConfig) {
    userConfig = {}
  }
  const config = [
    {
      name: 'accessKeyId',
      type: 'input',
      default: userConfig.accessKeyId || '',
      message: 'AccessKeyId 不能为空',
      required: true
    },
    {
      name: 'accessKeySecret',
      type: 'password',
      default: userConfig.accessKeySecret || '',
      message: 'AccessKeySecret 不能为空',
      required: true
    },
    {
      name: 'bucket',
      type: 'input',
      default: userConfig.bucket || '',
      message: 'Bucket不能为空',
      required: true
    },
    {
      name: 'zone',
      type: 'input',
      alias: '区域',
      default: userConfig.area || '',
      message: '区域代码不能为空',
      required: true
    },
    {
      name: 'path',
      type: 'input',
      alias: '存储路径',
      message: 'blog',
      default: userConfig.path || '',
      required: false
    },
    {
      name: 'customUrl',
      type: 'input',
      alias: '私有云网址',
      message: 'https://qingstor.com',
      default: userConfig.customUrl || '',
      required: false
    }
  ]
  return config
}
|
签名配置
根据青云对象存储签名特点,使用 accessKeyId 和 accessKeySecret 生成上传时的签名。
首先观察 strToSign :
strToSign = Verb + "\n"
              + Content-MD5 + "\n"
              + Content-Type + "\n"
              + Date + "\n"
              (+ Canonicalized Headers + "\n")
              + Canonicalized Resource
|
这里只上传图片,Verb 就是 PUT ,Date 使用 new Date().toUTCString() 。
考虑到签名的复杂程度,上传时不发送 Content-MD5 和 Content-Type 请求头以降低签名方法的复杂度。
然后就是 Canonicalized Headers :
Canonicalized Headers 代表请求头中以 x-qs- 开头的字段。如果该值为空,不保留空白行
这种自定义的请求头肯定是没有的,也可以去掉。
Canonicalized Resource 代表请求访问的资源
默认形式:/bucketName/path/fileName
考虑到 path 和 fileName 可能的中文情况,需要对其 encode 一下。
对 strToSign 进行签名
将API密钥的私钥 (accessKeySecret) 作为 key,使用 Hmac sha256 算法给签名串生成签名, 然后将签名进行 Base64 编码,最后拼接签名。
完整代码如下:
import crypto from 'crypto'
const generateSignature = (options: any, fileName: string): string => {
const date = new Date().toUTCString()
const strToSign = `PUT\n\n\n${date}\n/${options.bucket}/${encodeURI(options.path)}/${encodeURI(fileName)}`
const signature = crypto.createHmac('sha256', options.accessKeySecret).update(strToSign).digest('base64')
return `QS ${options.accessKeyId}:${signature}`
}
|
protocol 和 host
对于配置了 customUrl 的私有云用户,需要获取到 protocol 和 host 。
const getHost = (customUrl: any): any => {
  let protocol = 'https'
  let host = 'qingstor.com'
  if (customUrl) {
    if (customUrl.startsWith('http://')) {
      protocol = 'http'
      host = customUrl.substring(7)
    } else if (customUrl.startsWith('https://')) {
      host = customUrl.substring(8)
    } else {
      host = customUrl
    }
  }
  return {
    protocol: protocol,
    host: host
  }
}
|
配置 request
const postOptions = (options: any, fileName: string, signature: string, image: Buffer): any => {
  const url = getHost(options.customUrl)
  return {
    method: 'PUT',
    url: `${url.protocol}://${options.zone}.${url.host}/${options.bucket}/${encodeURI(options.path)}/${encodeURI(fileName)}`,
    headers: {
      Host: `${options.zone}.${url.host}`,
      Authorization: signature,
      Date: new Date().toUTCString()
    },
    body: image,
    resolveWithFullResponse: true
  }
}
|
配置插件 Plugin 的 handle
组合上述方法,处理上传逻辑
const handle = async (ctx: picgo): Promise<picgo> => {
  const qingstorOptions = ctx.getConfig('picBed.qingstor-uploader')
  if (!qingstorOptions) {
    throw new Error('Can\'t find the qingstor config')
  }
  try {
    const imgList = ctx.output
    const customUrl = qingstorOptions.customUrl
    const path = qingstorOptions.path
    for (let i in imgList) {
      const signature = generateSignature(qingstorOptions, imgList[i].fileName)
      let image = imgList[i].buffer
      if (!image && imgList[i].base64Image) {
        image = Buffer.from(imgList[i].base64Image, 'base64')
      }
      const options = postOptions(qingstorOptions, imgList[i].fileName, signature, image)
      let body = await ctx.Request.request(options)
      if (body.statusCode === 200 || body.statusCode === 201) {
        delete imgList[i].base64Image
        delete imgList[i].buffer
        const url = getHost(customUrl)
        imgList[i]['imgUrl'] = `${url.protocol}://${qingstorOptions.zone}.${url.host}/${qingstorOptions.bucket}/${encodeURI(path)}/${imgList[i].fileName}`
      } else {
        throw new Error('Upload failed')
      }
    }
    return ctx
  } catch (err) {
    if (err.error === 'Upload failed') {
      ctx.emit('notification', {
        title: '上传失败!',
        body: `请检查你的配置项是否正确`
      })
    } else {
      ctx.emit('notification', {
        title: '上传失败!',
        body: '请检查你的配置项是否正确'
      })
    }
    throw err
  }
}
|
注册插件
将 uploader 注册即可:
export = (ctx: picgo) => {
  const register = () => {
    ctx.helper.uploader.register('qingstor-uploader', {
      handle,
      name: '青云 QingStor',
      config: config
    })
  }
  return {
    uploader: 'qingstor-uploader',
    register
  }
}
|
发布插件
先登录 npm 账号
发布到 npm 上就可以了
